Deploy your Dash app over the web in a single command.
Yes, share it with the world real quick and easy.
Yes, share it with the world real quick and easy.
See the link to my simply Dash app on Heroku and the example code and data to build the app on my GitHub repository.
Plotly Dash is a popular Python-based web framework for developing data visualization applications. By default, Dash apps run on localhost — you can access them on your own machine. It is nice to see your beautiful dash app running locally, but it would be even more exciting if others can also see and interact with it over the web too! To share a Dash app, you need to deploy it to a server.
In this article, we will explore a new command-line tool called DashTools that was recently developed (git repo) to easily deploy your dash app to an online cloud platform called Heroku. Although there are other providers you can choose from such as Microsoft Azure and Amazon Web Services, Heroku is one of the easiest platforms for deploying and managing public Flask applications, and most importantly, it currently offers a free plan which is probably sufficient for most of us.
A. Installation
DashTools allows you to deploy your app to Heroku in a very easy manner, let’s get started by installing all required packages. To host a dash app with Heroku, we will need the following at minimum:
1. The Git CLI. You can download here.
2. The Heroku CLI. You can download here.
3. A Heroku Account. You can signup here for free (and paid) account.
4. Python Version ≥ 3.6. You can download here.
5. Dashtools. You can install using: pip install Dashtools
6. A dash app ready to deploy
B. Step-by-step Guide
- Create a new folder for your project:
A common approach for Dash is to use CSV data that is locally located inside the project folder. For this, you can use the CSV Dash-tools template to create a project with CSV data. In your virtual environment, create a project by simply typing the following:
Dashtools init MyDashapp csv
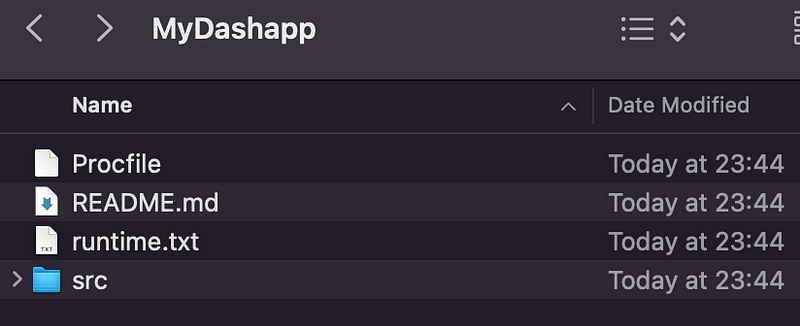
What this command does is initialize a project folder called MyDashapp with a runtime.txt, a Procfile file, and a requirements.txt file and a folder called src that contains a data folder and a sample app (app.py) that you are going to need for the deployment because these files will enable Heroku to recognize a python app.
- Requirements.txt: This is needed to tell Heroku which libraries it needs to install in order to execute the code.
- App.py: The python code should be inside the app.py

2. Update the data folder
Go to the data folder within your project/src folder and replace the default CSV file in the data folder with your own CSV file. Use the following code to read your data in the app.py file:
import pathlib
PATH = pathlib.Path(__file__).parent DATA_PATH = PATH.joinpath("data").resolve() df = pd.read_csv(DATA_PATH.joinpath(“Yourcsvfilename.csv”))
3. Update your app.py file
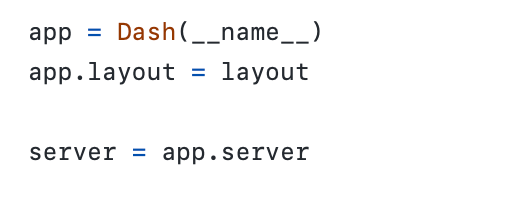
The next thing you want to do is to update the app.py file to replace the sample app with your own code which you use to build the dash app that is already running locally. Copy the code for your Dash app into this app.py file. Make sure that the app.pyfile in your project folder has server = app. server declared after the app = Dash(…) declaration.
4. Run the app locally
In your terminal, now go to your project’s directory, e.g “MyDashApp” and go to the folder src - where the app.py file is located, and type the following:
python app.py
What this command does is start the local development server that hosts your app on your machine. Now if you go to your browser: http://127.0.0.1:8050/, you should see your app there.
_Join the_** Medium membership** program to continue learning without limits. I’ll receive a portion of your membership fee if you use the following link, at no extra cost to you.
Join Medium with my referral link — Lan Chu
_Read every story from Lan Chu (and thousands of other writers on Medium). Your membership fee directly supports Lan Chu…_huonglanchu.medium.com
5. Initialise Heroku and deploy
To deploy your app to Heroku, make sure you installed Heroku Command Line. In your project’s directory in your terminal, type the following:
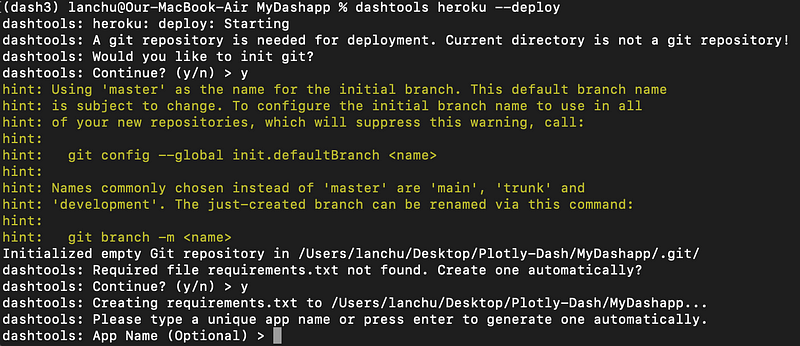
dashtools heroku –-deploy
This dashtools heroku --deploy command will create Procfile, requirements.txt, and runtime.txt if none are found (because you either do not call the “dashtools init” or you do not create the runtime.txt, and a Procfile and requirements.txt manually). Entering Y will create one automatically for you. If you have your own requirements.txt file already, you can choose N.
An issue I found with the auto-created requirements.txt was that I kept running into the following error:
Error processing line 1 of /Users/lanchu/mambaforge/envs/dash3/lib/python3.9/site-packages/distutils-precedence.pth:
Traceback (most recent call last):
File "/Users/lanchu/mambaforge/envs/dash3/lib/python3.9/site.py", line 169, in addpackage
exec(line)
File "<string>", line 1, in <module>
ModuleNotFoundError: No module named '_distutils_hack'
which is caused by the pinned version of setuptools in requirements.txt. Removing this pinned version in the requirements.txt file solves the problem.
You will then be prompted to follow steps to complete deployment. For example, you need to enter a Heroku app name. Either you can press Enter to have one generated automatically, or you can enter your own.
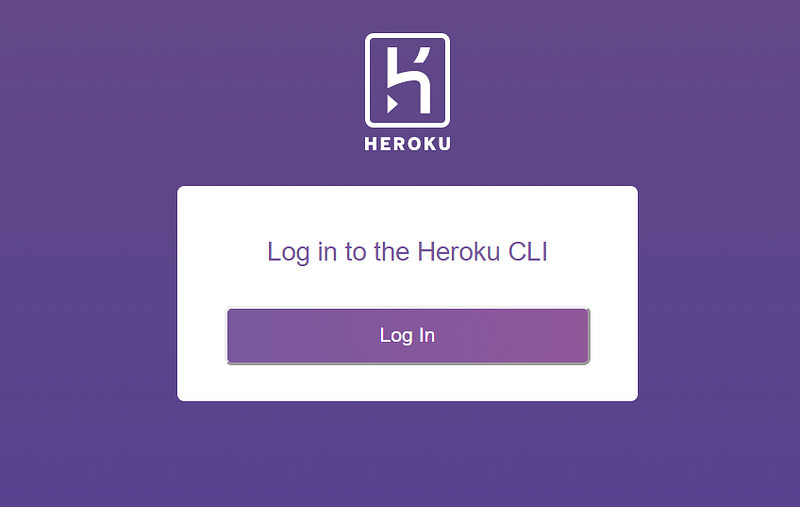
Lastly, you will be requested to log in Heroku. The deployment process will run automatically. When it is complete, your application web URL and management page URLs will be printed to screen. And boom! Click on the link to see that your app is now live!
5. Update the app
If you want to update the app, simply type the following in your terminal:
dashtools heroku –update
the changes will get updated on your app on Heroku in just a matter of a minute, how cool right! And there you have it! Quick and easy way to deploy your Dash app for free. Let me know in the comments what you think :)
References
By Lan Chu on September 8, 2022.